Do I Need a Pro Photographer for High-Res eLearning, or Can I DIY It?
High-Res eLearning is a gamechanger in workplace training courses because it provides employers and educational course designers the ability to create truly immersive environments for learners.
Unlike traditional eLearning formats, High-Res eLearning modules present material about procedures, work tools and machines, and tasks in the fullest context of ultra-high resolution images. When learners are engaged in contextually rich visual and spatial environments, information is processed more easily and fully, with better retention of knowledge.
Do you have the right equipment and skill to create photographs appropriate for High-Res eLearning course design? What exactly is “high resolution,” and why does it matter? What if you only have a smartphone?
Previous articles in this series have covered the following topics:
- The cognitive science supporting High-Res eLearning
- Why learning in context is so important for workplace training
- How zooming and panning in high-resolution photographs can enhance learning
- How to begin designing your first course
- How to start implementing a High-Res eLearning program in your organization
- How to pick the right scenes for your course
In this article, we discuss photographing your workplace for your High-Res eLearning modules, including what type of camera to use, lighting tips, and best practices for getting the most out of your photoshoot.
Do I Need a High-End Camera for High-Res eLearning?
As the name suggests, High-Res eLearning courses are built using very high resolution photographs, ideally between 24 and 225 megapixels (MP). This allows learners to zoom deeply into every part of an image.
A megapixel is one million pixels. That means your images will be huge – and necessarily so. High-Res eLearning is built around the understanding that our brains better process, retain, and recall information that is introduced in context, through “item-context binding” in the hippocampus. For that reason, High-Res eLearning utilizes high resolution photography as an integral part of sound lesson design, not a flashy technical gimmick.
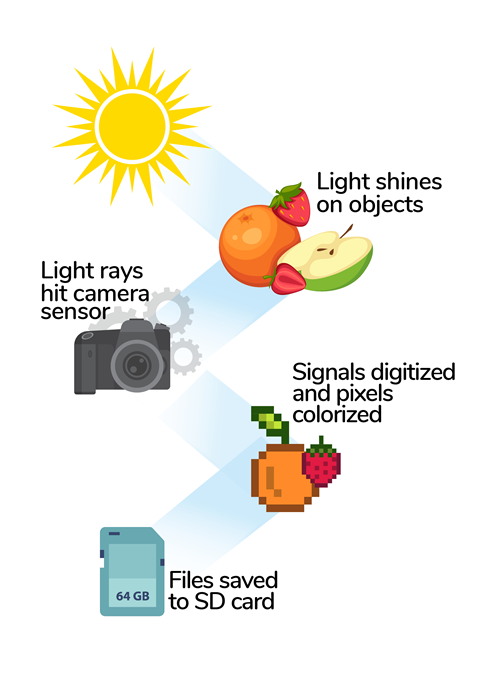
A point about pixels: The word “pixel” is short for “pics” and “element.” And a pixel is pretty much what the word sounds like: it is the smallest element in a digital picture.
Because a pixel is a tiny sample of an image, the more samples that an image contains, and the tinier those samples are, the more accurate the representation of what you’ve photographed. If one hundred thousand pixels come together to resemble something in a blocky way, a million pixels would look a lot smoother and more accurate because they’d be a lot smaller. Makes sense, right?
In general, a digital camera’s MP rating refers to the number of display “elements” it has in the dimensions of a photo. If a photograph is 7,000 by 5,000 pixels, that means the camera that produced it is capable of 35 million pixels, or 35 MP.
A minimum of 24 megapixels will provide the framework to create High-Res eLearning modules in which the broadest regions and smallest details of a photograph can be activated as hotspots, creating a content-rich, contextual learning environment. Images of 24 megapixels will also allow for more flexibility when it comes to framing and editing your scenes.
All that said, when it comes to photo quality, all the megapixels in the world won’t matter if your camera hardware isn’t up to the job.
Not all cameras are created equally
Success in taking quality High-Res eLearning images depends on a combination of things: the quality of the camera’s internal sensor that captures the light; how accurately that light is funneled into the camera via the lens; the camera settings you choose; the lighting; and, ultimately, how well you take the picture.
Q: Do I need a professional-grade camera?
A: Yes. A professional full frame DSLR or mirrorless camera with a resolution rating of 24MP or higher is best. Second best would be a quality 24MP or higher “pro-sumer” digital camera with a full frame or crop sensor.
Point-and-shoot cameras, micro four-third cameras, and smartphones – ideal for some uses because of their portability and ease of use – cannot produce images with sufficient sharpness and resolution for High-Res eLearning. Their sensors are simply too small and their built-in lenses too limiting for the job.
The importance of a good lens
Good glass, as professional photographers call their lens, is just as important as the camera you use. A big part of what makes a tack-sharp image is how well a lens is constructed, and how accurately it funnels light into your camera. Klixel8 recommends the following:
If you can afford the top of the line glass, purchase two or three prime lenses. Choose a prime wide-angle lens for those wide scenes where you need to photograph lots of workspace. Choose a quality rectilinear prime lens (or two) with focal lengths of 35mm and 85mm for narrower scenes or close-up shots.
If your budget is more limited, choose a well-reviewed mid-grade wide lens, plus one quality zoom lens. That combination will give you great flexibility in capturing everything from the factory floor down to the precision screws in an assembly.
If possible, avoid using a lens that comes bundled with a pro-sumer camera. These kit lenses vary in quality. Mileage will vary as to how sharp an image they can produce.
Take a stand!
Let us level with you: A sturdy tripod is a must for your photo shoot.
Even with the best camera and lens in hand, your lighting on point, and everything else in place, crystal clear images are not guaranteed. Why? Because you’ve got a heart beating in your chest, and if that camera is in your hand, the most minuscule jiggle – including your heartbeat – will introduce unwanted fuzziness into your photographs. The stabilization options built in to higher-end cameras cannot eliminate shakes, let alone prevent them, the way a good old-fashioned tripod can.
For deep zooming in an image you want those tiny pixels to be super sharp. Camera shake is your enemy. In addition to a tripod, Klixel8 recommends adding a remote shutter trigger.
Both of these pieces of equipment are low cost compared to your camera and lenses, and these two items will up your game considerably in hi-res photography. If you want to save a few bucks, skip the remote trigger and set your camera to click two seconds after you depress the shutter button.
Lighting and Photo Quality
Lighting is nearly as important as the camera when it comes to producing high-quality photos – which makes sense when you understand that a camera is like an eye: its function as an optical instrument is to process light. No light, no picture. Bad light? Bad picture.
Good light? Well, it doesn’t solve everything, but with proper lighting, you’re well on your way to producing a good picture, even if you don’t have a top-of-the-line dream camera.
Not too hot, not too cold…
Optimum lighting is the “just right” for capturing interior environments. When preparing pictures for High-Res eLearning, photographers should strive to capture scenes in good lighting. Colors will be true, and the subject of interest in your images will be neither obscured by dark shadows nor blown out with bright highlights.
From a cost perspective, natural lighting is very affordable. Unfortunately, many workplaces lack good natural light. In an indoor location with few windows, overhead lighting can offset less than ideal natural lighting. Lights near workstations and machines can also be used to help maintain detail and color fidelity in your photos.
If possible, use daylight-rated LED bulbs in light fixtures to provide natural light quality to your photos. You may also want to experiment turning on or off various lights in your work environment. When possible, avoid mixed types of light sources, especially fluorescent or sodium lights which impart greenish or pinkish tints that are notoriously difficult to correct in editing software.
Even with less than ideal lighting, using proper white balance and aperture settings on your camera, along with simple photo lights and reflectors, can greatly improve lighting conditions.
If your lighting is less than ideal, we offer an additional technical tip: shoot your high-res images either in RAW only or with the RAW plus JPG setting.
RAW photo files can be “tuned up” in photo editing software such as Photoshop. JPG images cannot. A remarkable amount of correction can be accomplished after the fact with RAW photo files and Photoshop. Shadowy areas can be made clearer, overly bright areas toned down, colors improved, and off-color tints from mixed light sources can be corrected to appear as if the photos were shot in natural daylight.
Can I Use a Smartphone to Create High-Res eLearning Courses?
Q: I don’t have professional gear. Can’t I just use my smartphone to create a High-Res eLearning course?
A: Yes, you can – as a pre-planning tool to create your course storyboard.
Newer smartphones cameras have resolution ratings of 10MP or more. A few smartphones even boast hi-res ratings comparable to professional digital cameras. But the bottom line is that they are currently nowhere near the quality possible from cameras that meet the megapixel, lens, and sensor specifications described above.
Again, a smartphone’s advantage – being a pocket-sized camera – is its disadvantage in terms of the size of sensor and lens it can accommodate. However, your smartphone is an invaluable tool when it comes to designing your High-Res eLearning course.
Klixel8 recommends taking photos with a smartphone to produce a storyboard for your course modules.
Get your story straight
Creating a storyboard brings two primary benefits:
First, the process of taking photos will give you a clearer idea yourself of what you need to include in your eLearning program. There is an axiom in education that you don’t truly know a subject until you teach it to someone else. In other words, in the process of planning a lesson, educators often hone in on what is really most essential about the information.
In mocking up a storyboard with your own images, you’ll refine what you need your trainees to learn and find the most direct way to present that knowledge. This process of getting inside the gears of the workflow has long-term benefits in developing your workplace training program.
Second, while your storyboard may not suffice as a finished High-Res eLearning course, it will serve as the perfect “shot list” for a professional photographer. Using your images as a guide, a pro can efficiently recreate your scenes in the span of an afternoon.
Many freelance professionals have the high-end gear, lighting and shooting knowledge along with Photoshop and post-production software and skills to produce great quality hi-res imagery.
Ask to see their commercial portfolio. Your eyes will tell you if they are up to the task. Most can deliver finished images that that meet or exceed the 24MP or greater requirement for hi-res deep zooming, and their prices are often quite reasonable.
The Klixel8 team can vet a photographer you’re considering, or we’re happy to arrange a site visit by one of our professional photographers to finalize your images.
Want to learn more? Our experts are here to answer any questions you have about developing a High-Res eLearning program in your company or organization.
Contact us today for a live demonstration at https://klixel8.com/#live-demo, or call us toll free at (833) KLIXEL8 (833.554.9358).